Thursday 26 May 2011

Are you a model? - 30th Birthday card

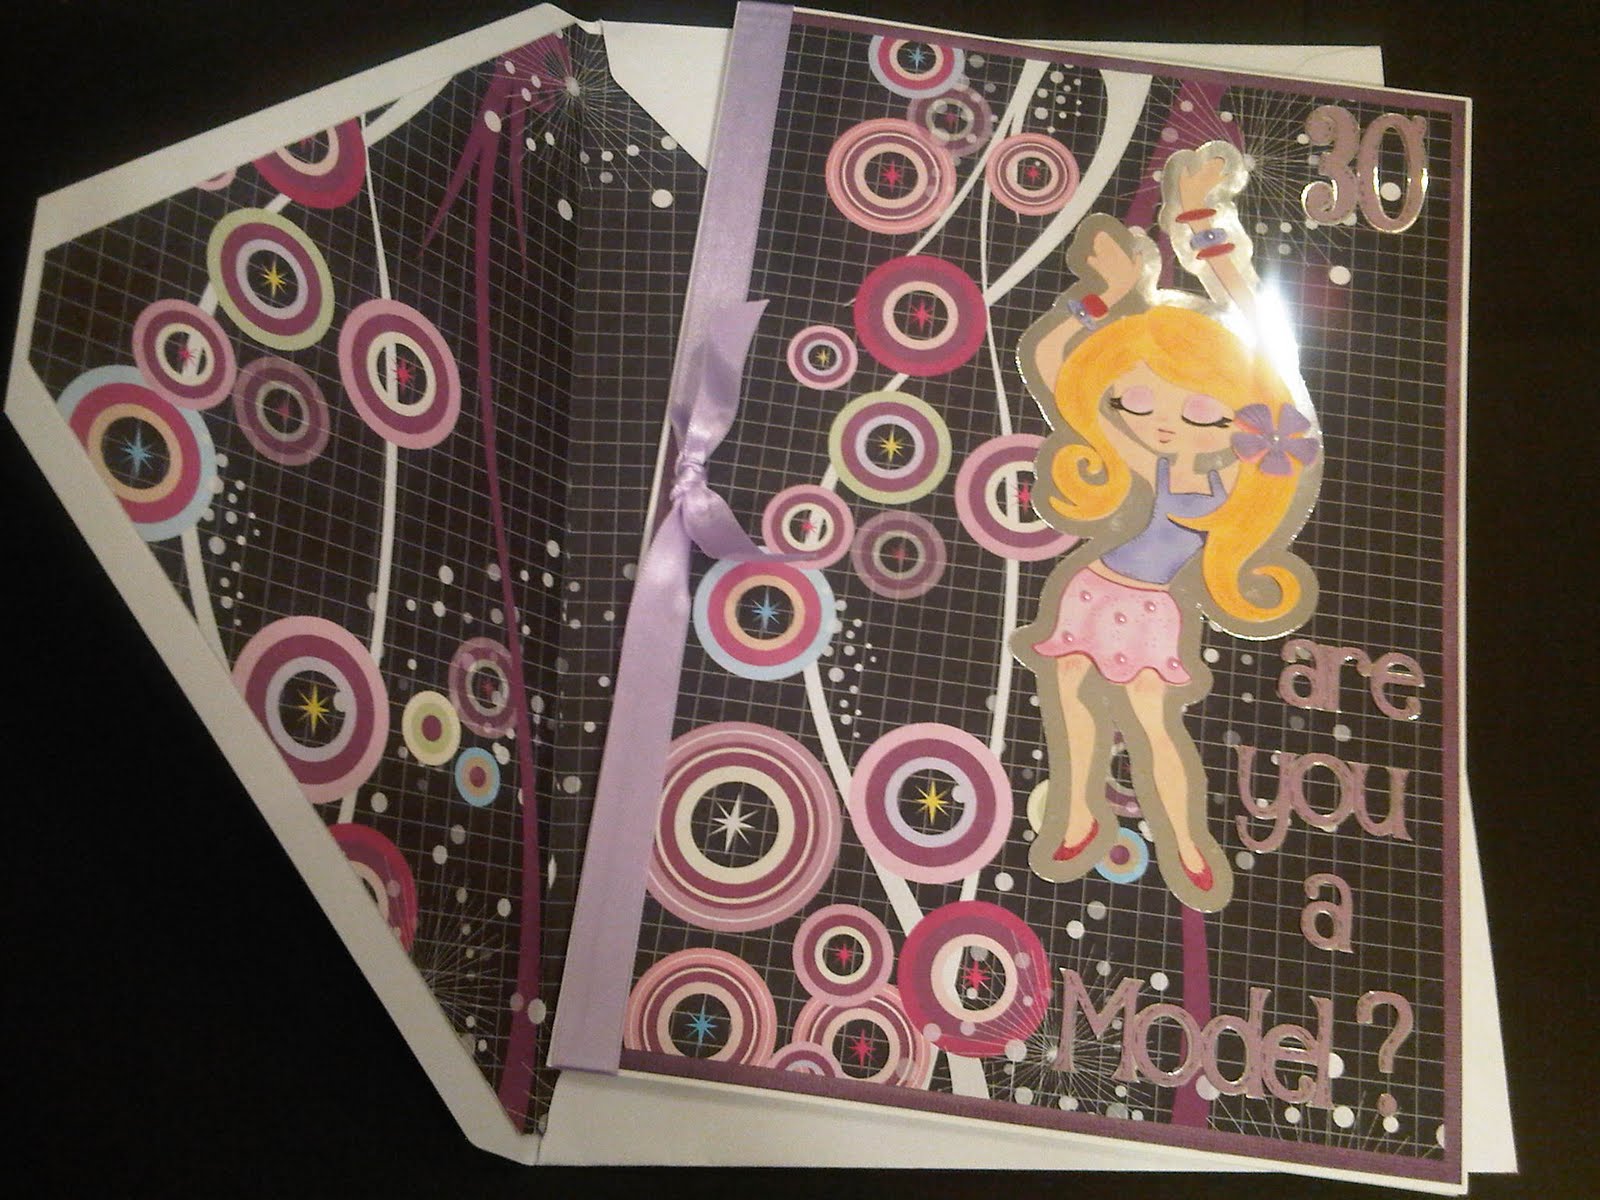
A work colleague requested a card for her sister, she wanted a card that depicted things said by people which she rips her sister for, to include the sayings.."are you a model (on front of the card)?" and "your a natural beauty (on the inside of the card)"... the card went down well;

I designed the card on the cricut gypsy using Alphalious for the wording cut at 1" and Rock Princess for the Model cut at 8". I used chalks and fine art pens for the shading and to add details. Mirror card was used for the shadow backings for the Model and the lettering. I added ribbon, flat backed pearls, glitter glue, punched flowers and mini gem butterflies to embellish the card both inside and out. The retro card used on this card and to line the envelope was a good buy from Lidl, bought when they had scrap booking items on offer! It really set the idea for the card and enhanced the look! I'm really pleased with the over all look! 


May bug 1st Birthday Card

 This card was designed on the cricut gypsy using the mini monsters cartridge, it was designed especially for a special lil' boy who turned one on May 20th.

Shadowed using Tim Holtz distressed inks, and a white pencil crayon; buttons, tags, and brads added as embellishments, and a rub on birthday message. The card went down well. lots of fun had putting this card together.


Monday 16 May 2011

Mad Hatters - Well one anyway!

On the 29th April the Royal Wedding day, the village where I live had a full day of activities put on for all in the community to come and enjoy.

There was a 'mad hatters', hat competition in the evening.

I dressed three hats, and the bowling green one won!!! My fella is the green keeper, he mows the lawn trying to keep it in tip-top condition; but he also plays bowls! Therefore the hat depicted him!

The hat was an old fishing hat, I used a donut ring and covered it in felt to make the green; I cut grass from card and placed this all around the donut to hide the edges of the felt, followed by a ribbon. I stuck 4 pom-poms on top of the green to depict 3 woods and the jack! I then designed and cut out the lawn mower using GBS on the Gypsy. Added brads for the wheels and ribbon, and embillishments.


The hat took just over an hour to design and put together and now stands proudly in the trophy cabinet of the bowls club!


Lyssi modelling the winning hat!


 Lyssi's hat, she was that proud of it she wore it all day!


My hat, the colours are very patriotic!


Lyssi's froggy card to Lisa

Lyssi was given a little help in designing and putting this card together, she had a lot of fun in the construction of it.

Sunday 15 May 2011

Gift for mum!

 A for Amelia, a gift for mum Lisa from her husband, he forwarded me the babies very first photo which has been used here.

The A is MDF already coated in a white covering. I used baby pale pink paper which I drew around the A and added a rub on message;

'A new baby is like the beginning of all things - wonder, hope, a dream of possibilities'

A few flowers, a feather, beads and ribbon were added to one corner and the photo to the other, along with ribbon and a single flower embellishment; confetti was placed above the arch of the A near the legs.

Lastly the gift was wrapped in pink tissue paper and fastened in baby ribbon, triple bow made!

When Lisa received the gift, she was so surprised! As she had arranged with me to make the previous gifts posted, and didn't see this one coming!


A present for the proud grandparents!

These gifts were made for my friend Lisa to give to the babies grandparents (Amelia is their1st granchild) one was also made for her great grandmother.

The baby lettering is made from MDF (bought) which I painted using baby pink acrylic paint on the inside and on the back (3 layers used on each, it didn't half soaked up the paint)!

To get the lettering I used 4 differnet sheets of patterned paper and drew around the baby on each sheet, then cut them out, adhering the papers to the MDF. They slotted together perfectly!

I added flowers, ribbons and beads to the bottom B and the A. The 2 scan pictures (12 and 20 weeks) were framed and added, (I have added the 2 different designs), lettering rub ons added to the pale papers. Babies first decent picture following her birth adhered to the middle; skittles and confetti also added.

Lastly each baby keepsake was wrapped in tissue paper before being given to the proud grand parents (they loved their gift, it was so unexpected!)


New baby Girl card

I made this card for a friend who I met at line dancing, I was at my mums when I heard her good news (the baby arrived 2.5 weeks early!).

My sister gave me the design idea, it is an easel card with a difference, you have to put the tab to get this one to stand; she also let me raid her craft supplies and this card was designed using some free papers she received in a magazine.

The lettering was cut from quick cutz dies; ribbon, gems and added for the touch a little glitter glue to the background papers!

The card went down well, which was a joy to give.


Robotz 1st year Birthday card

This card was designed on the gypsy using the robotz cart, especially for a lil' boy who'll be turning one on the 20th May.

I used acrylic sheets 8" by 8" x 2 and thick (3mm) card x 2. I cover the card, one in robotz and the other in colourful card, the inside of the card I used plain card and edge them with cut offs.

The robot was cut at 5" and layered  up; the birthday lettering was at 1" ; the #1 at 1.5" all of which were adhered to the acrylic sheet.

The little boys name was cut at 0.7" and adhered to the robot page behind the acrylic sheet.

I used my Bind it (but fastened it back to front! Doh!) to hide my error I added multiple of ribbons 2" in length to it! I used a white pencil to hightlight areas; also wobble eyes to make it fun looking! 

On the inside of the card, I cut gears from off the robotz cartridge and embossed these using copper, brass and red, sticking the message  'Gear-riffic' to them also placing a picture of the little boy within. I cut another 5" blackout of the robot on the front of the card placing this inside for the message to be written upon.  2 further robotz at 2" were cut and adhered to the pages, as well as Birthday and some nuts and bolts(stickers) .

The box was made at 9" cm2 to allow room for the ribbons/binding, the lid was layered and again a blackout of the robot placed on the front for the giver to write the little ones name, along with a ribbon. The edges of the box on the insides were strengthened to make the box more durable.