

Papercraft and other creations made using a variety of means; cricut/design studio with free cut files; keepsake embossing boards; Arty Farty templates and more...


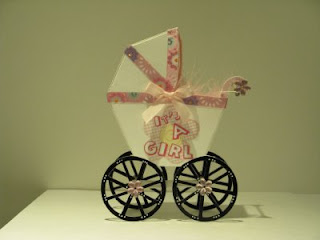
Coach Pram Instructions
Items you will need:
· Cricut & Design Studio and both the New Arrivals and George basic shapes cartridges
· Card of your choice
· Craft Knife
· Scissors
· Glue
· Lace (optional)
· 3 x Cocktail sticks (for wheels and handle)
· Embellishments of your choice
Instructions
1. If the cut has been downloaded and you’re outside of the UK, please go to the control panel on your PC and change the regional language/location from English/UK to your own.
2. Cut the file as you would normally using your design studio and Cricut.
3. If desired the second page of prams can stick to the first, this will make it round in appearance like the original cut on the New arrivals cartridge which will add strength to allow the pram to stand without the wheels bending due to it's weight.
4. Trim away the blanket look from off the pram.
5. Embellish away!!!
6. It is easier to colour the wheels while in the flat die cut form. I used glazed pens which as you can see it’s an effective way to colour them.
7. For the main body of the pram you will need to cut a length of same coloured card 26.6 cm by 5 cm, and then crease at the following intervals: 3.65cm; 7.15cm; 11.75cm; 13.5cm; 14.75cm; 16.5cm; 21.1 cm and then cut a flap to fold over at the pram handle end of 1.5cm.
8. If applying lace measure first around the area you want to place it before cutting, saves waste!! Big believer!! Glue and attach.
9. Neaten the pram edging with a creasing/blunt tool.
10. Personal choice, measure a length of card to go around the cocktail sticks at the wheels to make a tray! This also adds strength to the end result.


 I made this card for a young lad across the way who'll be starting school. I used GBS and LT cardt to complete this card. I'm very proud of my can of cola!!! The cut files are: 1. the lunch box


 This is the end result, making the crib using the layout previously added to this blog. Two were cut, placing the card pattern side down on one of the cuts to have the same pattern/colour all the way around.
 I made this using PP for the clouds, PD for the grass, and Alphalicious for the greeting. I cut the bear out in green card, placed it onto black paper to give it it's outline, I then added features, eyes etc. Using brads for the nose and eyes to give definition. I then added wooden lady bugs and fabric flowers, a button seagull and a pompom for the bears tail.


 locker talk cartridge. Ribbon has been added to both cards to give this impression of movement! Brads and buttons have been used to decorate.


 A work colleague requested I make one after she saw the one I had made for my brother, so here it is.
I made this card for my brother and his wife who have been trying for a baby since they married in July 2001, they even went through the lengthy process of IVF treatment, eventually baby Kiva was conceived naturally.
The card was made using Cricut and the New Arrivals cartridge. Added the personal touch-babies photo and a few embellishments.
Cut file: http://www.mediafire.com/?ukowabhjmgc