Monday, 7 December 2009

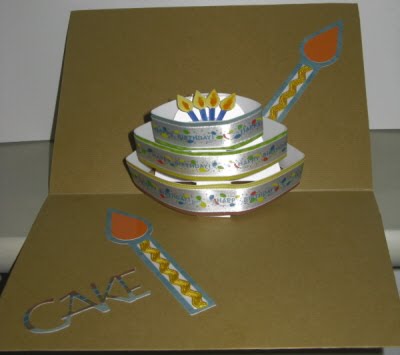
Pop-up Birthday card

I designed this card for a work colleague/friend, the card is A4 in size. I replicated the pattern which is hand cut, hopefully I shall design one using the cricut (but no plans to presently).


Sunday, 6 December 2009

3D Snowflake

Designed in Cricut Design Sudio using George n Basic Shapes and Joys of the Season carts. Folds flat into an envelope, once opened the snowflake moves into the 3D postion. I placed the sentiment area on the back of the card, so the snowflake is reflected in the mirror board card. I added small crystals to the snowflake and attached ribbon.

Cut File: http://www.mediafire.com/download.php?yjjegmyt3jc


This card looks much better in person, as I have a lot of reflection from the mirror board card.

Assembly Instructions:
  1. Cut out all the peices using your cricut in your choice of card, you will need both GBS and JOTS carts to make this project.
  2. Add the frame to the outside of the card.
  3. Decorate/ink your snowflakes, includes the snowflake in the card.
  4. Make a small cut down the side of the small cut out section, on one flake only.
  5. Slide the 2 seperate snowflakes together using the larger cut out sections.
  6. Slide the joined snowflakes through the snowflake attached to the card, using the small cut previously made in one of the snowflakes, slide this up the middle of the snowflake to allow the bottom of the snowflake to pass through and then slide down into place.
  7. Decorate with your choice of embellishments.
  8. Enjoy!!

3D Snowman, in 3 tiers

Designed using the Cricut Design Studio and George n Basic Shapes cart.  I took the design from the last 3D snowman inspired by Karen Burniston, and enhanced upon it, as many snowmen have the three sections (head, chest and stomach) I wanted to see if I could do the same look; I made a broom from scraps, orange card cut several times to look like bristles, joined into the broom handle Brown card folded and fixed in place with ribbon, and adhered this to his chest next to his arm as this area is stronger. Added ribbon to the snowman to reflect a scarf and black flat pearls as pieces of coal for his facial features and buttons.

The card itself is matted and layered on the front and on the inside of the card, using both mirror card and patterned paper.  I inked around the white card and used swiss dots embossing folder to add texture. Then cheated and added premade sticky embellishments (Santa and HoHoHo).

To construct, I just had to add the chest peices before I add the stomach! to make him stand/fold correctly!


Monday, 23 November 2009

3D Cake birthday card


I designed this file using GBS on the cricut design studio, again this cut was inspired by Karen Burniston and her sizzix creations, I made both a male and female version of this card.


Wednesday, 18 November 2009

3D Tree insert: He's making a list!


Maria did a fantastic job on her .cut file that I took the challenge and designed one for myself, last weekend after the snowman was such a hit!

Designed last weekend again like the 3D snowman, inspired by Karen Burniston and her sizzix die of the pop up tree. Used cricut design studio and GBS cart, this is my fourth attempt at cutting the tree as I had to make sure that the tree looked sturdy and was held together tightly without the possibility of falling apart as not held together by glue, it also had to fold flat within the card when closed. Well all accomplished as you can see. The design on the front of the card was made doing a spot of matting and layering and applying stickers which I bought a couple of years ago! I added flat backed crystals to the tree.

Saturday, 14 November 2009

Recieved an award


Thank you Mary AKA Meeker for the award.


The rules are: I need to pass this award on to five people, post on their blogs to let them know I left this award, and then I need to answer this list of questions in ONE word....

Here goes -

1. Where is your cell phone? on the table in front of me!

2. Your hair? A mess!

3. Your mother? At home packing for her hols!

4. Your father? Passed on

5. Your favourite food? Satsuma oranges! (tis the season!)

6. Your dream last night? Can’t remember

7. Your favourite drink? Lift Lemon Tea

8. Your dream/goal? To run my own buisness! (well it is a dream!)

9. What room are you in? Lounge

10. Your hobby? Card making

11. Your fear? Train Tracks, being caught on the wrong side of the barriers!

12. Where do you want to be in 6 years? A fraction of my former self!

13. Where were you last night? At home on the net!!

14. Something that you aren't? Dead!

15. Muffins? Chocolate!

16. Wish list item? The Gypsy!

17. Where did you grow up? Immingham, UK

18. Last thing you did? Study for my management AWARD!

19. What are you wearing? Navy trousers, white lacy top and a red soft cardigan!

20. Your TV? On watching 'recorded X factor'!

21. Your pets? Chocolate Labrador 'Gracie'

22. Friends? They are limited, so like diamonds precious and rare!

23. Your life? currently plodding on!

24. Your mood? Stable!

25. Missing someone? Daughter, presently at her dads!

26. Vehicle? Vaxhual Zafia

27. Something you're not wearing? footwear

28. Your favourite store? Anything which sells crafts, no particular fav!

29. Your favourite colour? Blue

30. When was the last time you laughed? Today

31. Last time you cried? Watched snow buddies with my DD, the story line, soft eh!

32. Your best friend? Helen Curtis, Oxfordshire

33. One place that I go over and over? My happy place!!

34. Facebook? Have

35. Favourite place to eat? Out! No dishes! Lol..

I am passing on the award to:

1. Diane
2. Jen C
3. Jason
4. Shelly
5. Lillie

Saturday, 7 November 2009

3D Snowman

Inspired by Karen Burniston and the Sizzix big die she had created, here is my version designed using the cricut and George n Basic Shapes cart. I decorated the snowman using black pearls to reflect pieces of coal, and cut the other items using the cricut. The snowflakes were cut from the noel cart at various sizes.


Friday, 6 November 2009

How to write text in a circle!

I have been playing around in Word and its easy! A little time playing will make my cards much more personal!


Here’s what you do if you don’t already know!

1. Open a new document
2. Click on word art and decide what style you want, enter
3. Now decide on your style of font, enter
4. Now right click onto your wording and go to format word art play with the colour until it’s what you’re after.
5. Now click on your word art and you’ll see spots! Surrounding what you have just done.
6. The word art tool bar should now be visible, click on the icon with the uppercase A and lowercase b & c also know as Word Shape Art – alternatively hover over the icons and the names of the icons will pop up!
7. Choose your shape – from the many options available!
8. Then use the stretch facilities of the spots surrounding the image and drag into place.
9. Use the bottom corner spots to resize the text shape to the required size.
10. You need to now save your document but not as a word document but as a picture.
11. Copy and paste your design into a graphics or picture programme i.e. serif
12. Go to file, ‘export’, and change the format / file extension from whatever you have to a .jpg it will then save as a picture which will look great on all your cards and layouts.
13. Happy Crafting!!

Wednesday, 14 October 2009

To cuddle the baby within. New Baby Card

Designed in CDS using GBS after I saw a cute card made using a babies cardigan.
Used the embosing folder with the hearts to leave the impression, added ribbon; lace; dummy; a tag; a couple of stickers and did a spot of doodling!!


Cut file: http://www.mediafire.com/download.php?4ymmnynhtmt

Tuesday, 6 October 2009

Snow Globe .cut file

Snow Globe designed using GBS. Used for the card in the previous post:


Cut file: http://www.mediafire.com/download.php?ztrwinnz2nz

Monday, 5 October 2009

Happy Anniversary

I wanted to be a little different this year for my sisters wedding anniversary, after all snow globes are not just for 'christmas', you can pick them up anywhere on your travels!!

I designed the snow globe in GBS making it a card with the appearance of 3D. The doves are from Beyond Birthdays and the banner from the Wedding cart. Used the cuttlebug to emboss the back page; used acetate and glitter (got a little carried away!)and made 3 ribbons of different sizes and fastened them together.